May 4, 2009

My Ubuntu Jaunty 9.04 Bootchart

My machine: Lenovo T61 T9300 2Gb 100Gb nvidia quadro 140m
ext4 filesystem
record: 14 sec

Really amazing isn't it?

FYI, same machine with ubuntu 9.04 on ext3 filesystem has a boot time of 27 sec.

PS: install bootchart by:

sudo apt-get install bootchart

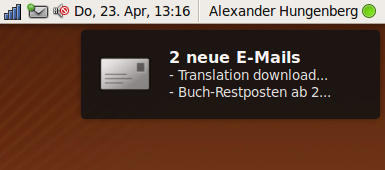
GMail Notifier for Ubuntu Jaunty 9.04 notification


The growl-like new notification style in Ubuntu Jaunty 9.04 is really fancy in my opinion. Today I just discovered this tiny application Gmail Notifier that can fully integrate with the new notification (checkgmail can't...yet).

However, compared to other notification application like checkgmail, there is limited functions in this gmail notifier. So it's your choice, better features (like monitoring a certain label) or fancy interface.

Check it out...
https://launchpad.net/gm-notify

Downloads
https://launchpad.net/gm-notify/+download

Mar 30, 2009

Mail notification for Mutt (and Gmail, Thunderbird, and etc)

I've introduced basic configuration for Mutt in recent posts. But we still have a problem: how do I get notified when I have new mail?

Gmail users might also have similar problem. We certainly don't want to login to Gmail every 2 minutes. Of course gtalk can solve this problem. But what if one has several Gmail accounts, or even have Gmail AND Yahoo accounts? (If you don't use Mutt, you can directly go to the Mail Notification part)

First, we need to let fetchmail to download new mails every, say, 5 minutes. This could be done by setting up a crontab job. Edit the crontab list in your terminal:

crontab -e


Then add the following line.

*/5 * * * * fetchmail -v >/dev/null


"*/5" means fetchmail will run every 5 minutes, and the part after ">" means there won't be any output.

OK, now fetchmail will download your emails automatically.

Mail Notification

The extra software you need to install is Mail-Notification.

sudo apt-get install mail-notification


You can run it from System -> Preference -> Mail Notification. In the Mailbox list, you can add your Mutt's mbox type mailboxes. Remember to check "Auto start Mail Notification upon session opening". Now once there is new mail in your mailboxes, a notification will appear in the status area.


Note that "Mail Notification can monitor multiple mailboxes concurrently, and supports Evolution, Gmail, IMAP, Maildir, mbox, MH, Mozilla products (Mozilla, SeaMonkey, Thunderbird, …), POP3, Sylpheed, Windows Live Hotmail and Yahoo! Mail mailboxes." (Description and screenshot are from http://www.nongnu.org/mailnotify/)

So, if you are a Gmail user, you can also use Mail Notification to check if there's new mail in the server. This is really a handy software.


Mar 29, 2009

How to hide menu and tool bar in GVim

By default, GVim has a menu and tools bar, like this:

But most of the time, the reason why people use GVim or Vim is that they don't need to use mouse - the powerful keyboard shortcut is enough for an efficient editing. So it seems like a waste of space to have this menu and tools bar. Here I will introduce a tip to hide the menu and a keyboard shortcut to recall it.

In your .vimrc file, add the following lines.

"Toggle Menu and Toolbar
set guioptions-=m
set guioptions-=T
map <silent> <F2> :if &guioptions =~# 'T' <Bar>
\set guioptions-=T <Bar>
\set guioptions-=m <bar>
\else <Bar>
\set guioptions+=T <Bar>
\set guioptions+=m <Bar>
\endif<CR>


The next time you use GVim, it will automatically hide the menu bar. And you can use F2 to recall it and hide it again.


Note that you can change the second and third lines to the following(with a "+" sign), and GVim will start with a menu bar and you still can toggle with F2 key.

set guioptions+=m
set guioptions+=T

Mar 28, 2009

Ubuntu guitar software for guitarist

I play a little guitar. Yesterday I came across a problem: how do I play gp5, gp4 or ptb in Ubuntu? In Windows, we have Guitar Pro, which is not free, but I think it's an easy job to get a serial number...But how about in Ubuntu?

The answer is Tuxguitar.

With TuxGuitar, you will be able to compose music using the following features
  • Tablature editor
  • Score Viewer
  • Multitrack display
  • Autoscroll while playing
  • Note duration management
  • Various effects (bend, slide, vibrato, hammer-on/pull-off)
  • Support for triplets (5,6,7,9,10,11,12)
  • Repeat open and close
  • Time signature management
  • Tempo management
  • Imports and exports gp3,gp4 and gp5 files
Here's the screenshots:
http://www.tuxguitar.com.ar/screenshots.html


When I installed the Tuxguitar, there's a soundbank error. The solution is already on the website:
http://www.tuxguitar.com.ar/tgwiki/doku.php?id=doc:error_soundbank

Other than Tuxguitar, I'd like to introduce another useful software Gtick. This is not only for guitarist.
http://www.antcom.de/gtick/

Gtick supports different meters (Even, 2/4, 3/4, 4/4 and more) and speeds ranging from 10 to 1000 bpm. It's really useful for beginner musicians.


Mar 27, 2009

Install Ubuntu 9.04 (Jaunty Jackalope) Beta in your virtual machine

Well, Ubuntu 9.04 beta is out. But as a Linux newbie, I don't really want to install it directly in my computer -- it's still a beta version. So a good idea to experience while it's still hot is to install it in a virtual machine. Here's a step by step guide:

Install Virtualbox

A complete community document could be found at:
https://help.ubuntu.com/community/VirtualBox


OK, let's get started. Run the following command:

sudo apt-get install virtualbox-ose
sudo apt-get install virtualbox-ose-modules-`uname -r`
sudo adduser $USER vboxusers
sudo apt-get install util-linux


The document mentioned something about module problem for kernel version 2.6.24-22 or higher, which is no longer a concern.

Then logout and relogin.

Install Ubuntu 9.04 in Virtualbox

If you have a multi-core CPU, start virtualbox this way. In your terminal:

taskset -c 1 virtualbox


This will force virtual box to use only one core.

In the virtualbox, click "New", then name your virtual machine. In the OS type menu, select "Linux 2.6".

Then you need to assign memory to your virtual machine. I give it 512M out of my 2G memory. And I selected dynamic size virtual hard drive. This is pretty much it. Other things are quite straight forward.

Before you start your virtual machine, in "CD/DVD mount" section on the right, mount the Ubuntu 9.04 iso, which can be downloaded here.

Then press start, and enjoy!

Mar 26, 2009

Ubuntu 9.04 is out today!

Although it's not out yet...Check out their website later today.

Link.

Mar 25, 2009

Multiple Inbox View in Gmail


Gmail is probably the best webmail so far. Now it is possible to have multiple inboxes view through a new Gmail Lab application: Multiple Inboxes.

Just go to setting -- Labs, enable the
Multiple Inboxes application, the n save setting. When you get back to the inbox view, you'll see three inboxes awkwardly lie there...Then go to the setting -- Multiple Inboxes. Here you can define what kind of inboxes do you want, and the layout you want.

For example, you can type "label:Important" in Pane 0, then all the emails labeled as Important (you can set a filter to auto apply label to incoming messages) is displayed in a seperate inbox in the inbox(es) view.

For the layout, I recommend Below the inbox.

Enjoy!

Mar 24, 2009

Linux Kernel 2.6.29 Released !


Original Link

Here's the full article:

Quote:
"It's out there now, or at least in the process of getting mirrored out.

The most obvious change is the (temporary) change of logo to Tuz, the Tasmanian Devil. But there's a number of driver updates and some m68k header updates (fixing headers_install after the merge of non-MMU/MMU) that end up being pretty noticeable in the diffs.

The shortlog (from -rc8, obviously - the full logs from 2.6.28 are too big to even contemplate attaching here) is appended, and most of the non-logo changes really shouldn't be all that noticeable to most people. Nothing really exciting, although I admit to fleetingly considering another -rc series just because the changes are bigger than I would have wished for this late in the game. But there was little point in holding off the real release any longer, I feel.

This obviously starts the merge window for 2.6.30, although as usual, I'll probably wait a day or two before I start actively merging. I do that in order to hopefully result in people testing the final plain 2.6.29 a bit more before all the crazy changes start up again.

Linus"

Mar 19, 2009

Funny Video: road to erotic comics...

Check this out...Although it's not about Linux...


Great, huh? Anyway, here's an useful tip if your are interested.

In your .bashrc file, add the following line:

alias ins="sudo apt-get install"

Then when you need to install something, just type:

ins something

However the bad thing is that when you're TABing if you're not sure about the package name, there won't be any suggestion.

You can also alias other frequently used commands like:

ls -al

Mutt Color Configuration

Since Mutt is a text based email client, it doesn't have fancy themes like Evolution, Thunderbird. But one can still configure the color theme for better viewing experience.

Configuration of Mutt's color theme is pretty easy. Just follow this style:

color [object] [foreground] [background]


Here is a color theme I developed. It contains color for index, pager (including header, seven level of quoted message), marker, highlight of Email address and link location, and etc.

Enjoy!


# Colours for items in the index
color index brightcyan black ~N
# Hmm, don't like this.
#color index brightgreen black "~N (~x byers.world)|(~x byers.x)|(~x langly.levallois123.axialys.net)|(~x the.earth.li)"
color index brightyellow black ~F
color index black green ~T
color index brightred black ~D
mono index bold ~N
mono index bold ~F
mono index bold ~T
mono index bold ~D

# Highlights inside the body of a message.

# URLs
color body brightgreen black "(http|ftp|news|telnet|finger)://[^ \"\t\r\n]*"
color body brightgreen black "mailto:[-a-z_0-9.]+@[-a-z_0-9.]+"
mono body bold "(http|ftp|news|telnet|finger)://[^ \"\t\r\n]*"
mono body bold "mailto:[-a-z_0-9.]+@[-a-z_0-9.]+"

# email addresses
color body brightgreen black "[-a-z_0-9.%$]+@[-a-z_0-9.]+\\.[-a-z][-a-z]+"
#mono body bold "[-a-z_0-9.%$]+@[-a-z_0-9.]+\\.[-a-z][-a-z]+"

# header
color header green black "^from:"
color header green black "^to:"
color header green black "^cc:"
color header green black "^date:"
color header yellow black "^newsgroups:"
color header yellow black "^reply-to:"
color header brightcyan black "^subject:"
color header red black "^x-spam-rule:"
color header green black "^x-mailer:"
color header yellow black "^message-id:"
color header yellow black "^Organization:"
color header yellow black "^Organisation:"
color header yellow black "^User-Agent:"
color header yellow black "^message-id: .*pine"
color header yellow black "^X-Fnord:"
color header yellow black "^X-WebTV-Stationery:"
color header yellow black "^X-Message-Flag:"
color header yellow black "^X-Spam-Status:"
color header yellow black "^X-SpamProbe:"
color header red black "^X-SpamProbe: SPAM"


# Coloring quoted text - coloring the first 7 levels:
color quoted cyan black
color quoted1 yellow black
color quoted2 red black
color quoted3 green black
color quoted4 cyan black
color quoted5 yellow black
color quoted6 red black
color quoted7 green black


# Default color definitions
#color hdrdefault white green
color signature brightmagenta black
color indicator black cyan
color attachment black green
color error red black
color message white black
color search brightwhite magenta
color status brightyellow blue
color tree brightblue black
color normal white black
color tilde green black
color bold brightyellow black
#color underline magenta black
color markers brightcyan black
# Colour definitions when on a mono screen
mono bold bold
mono underline underline
mono indicator reverse


Related Links:
Multiple accounts in Mutt
Mutt Tutorial

Mar 18, 2009

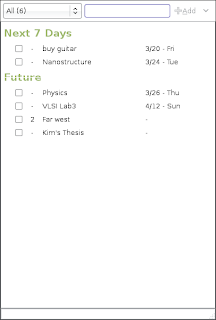
HOWTO: Remember the Milk in Ubuntu

Remember the Milk (RTM) is a popular getting things done (GTD) website. It could also be accessed from Ubuntu desktop. Here's how.

TasqueTasque is a software in Linux, which support RTM. However, it is not included in default Ubuntu source. So you need to add the following source:

deb http://ppa.launchpad.net/tasque-packagers/ubuntu hardy main

To add the source, visit System-Administration-Software Sources-Third Party Sources-Add

Then install it in terminal

sudo apt-get install tasque


Ok. The following are easy, just login via Tasque.

Screenlets
You can also put RTM on your desktop. Here's how.
1. Install latest screenlets. The deb package could be downloaded here.
2. In the screenlets configuration window, click install and choose Convert Web Widget. then copy the following to the box:

<script src="http://gmodules.com/ig/ifr?url=http://www.rememberthemilk.com/services/modules/googleig/rtm.xml&up_showNoDue=false&synd=open&w=320&h=300&title=Remember+The+Milk?=all&country=ALL&border=%23ffffff%7C3px%2C1px+solid+%23999999&output=js"></script>

3. If there is an error about gtkmozembed, run the following command

sudo apt-get install python-gnome2-extras


Ok. Done.


Mar 17, 2009

Various Linux related Cheat Sheets

It is always easier to have cheat-sheet by hand, isn't it? Here I collected some popular Linux software (Linux/Unix basic commands, LaTeX, Emacs, Mutt, Ubuntu, Vim) cheat-sheets for your reference, as follows.

Latex cheat sheet
Vim cheat sheet
Linux/Unix command cheat sheet
Ubuntu cheat sheet
Emacs cheat sheet
Mutt cheat sheet

Link
(It's in my domain. Don't worry.)

Feb 28, 2009

Be a registered Linux user and Ubuntu user!

Did you notice the "Registered Linux user 485011" pic on the right? What are your waiting for? Register your machine NOW!

http://counter.li.org/

Also, register as a Ubuntu user if you are using Ubuntu here, and get a cool tag:

http://ubuntucounter.geekosophical.net/

Look at the names of Linux servers of ECE@UTexas

ryu.ece.utexas.edu
ehonda.ece.utexas.edu
blanka.ece.utexas.edu
guile.ece.utexas.edu
ken.ece.utexas.edu
chunli.ece.utexas.edu
zangief.ece.utexas.edu
dhalsim.ece.utexas.edu
balrog.ece.utexas.edu
vega.ece.utexas.edu
sagat.ece.utexas.edu
mbison.ece.utexas.edu
cammy.ece.utexas.edu
deejay.ece.utexas.edu
thawk.ece.utexas.edu
feilong.ece.utexas.edu
akuma.ece.utexas.edu
gouki.ece.utexas.edu

Feb 27, 2009

Multiple accounts in Mutt

Q: How to set up multiple accounts in Mutt?
A: Three steps:
  1. Set up multiple accounts in fetchmail to receive emails from different accounts;
  2. set up multiple accounts in msmtp to send email with multiple accounts;
  3. set up multiple accounts control in mutt.
The first step is explained in my Mutt tutorial post. I assume now you can receive different emails from This post will focus on how to control send emails with different accounts.

First of, you need to have multiple accounts setting in your .msmtprc file. For example, here I have two Gmail accounts setting:

account gmail
host smtp.gmail.com
port 587
from goodguy@gmail.com
tls on
tls_starttls on
tls_trust_file /home/usrname/mail/certs/Thawte_Premium_Server_CA.pem
auth on
user goodguy
password 1234567

account gmail1
host smtp.gmail.com
port 587
from badguy@gmail.com
tls on
tls_starttls on
tls_trust_file /home/usrname/mail/certs/Thawte_Premium_Server_CA.pem
auth on
user badguy
password abcdefg

account default: gmail

Default account is the first account, as specified in the config file. Now what you need to do is to control when to send email with first account, and when with the second account.

You need add the following lines to your .muttrc file to enable multiple accounts support.

Few things to explain. There is a "from" environment in your .muttrc file. If the default value is goodguy@gmail.com, your default account when composing email or replying email sent to accounts other than the emails specified in "alternate" emails is goodguy@gmail.com.

The ugly status set in the macro is to help you know what the "from" environment is.

set envelope_from ="yes"

set reverse_name=yes

alternates "goodguy@gmail.com|badguy@gmail.com"

macro index \e1 ":set signature=~/.signature_private\n:\
set from=goodguy@gmail.com\n:set status_format=\"-%r-Gmail: %f \
[Msgs:%?M?%M/?%m%?n? New:%n?%?o? Old:%o?%?d? Del:%d?%?F? \
Flag:%F?%?t? Tag:%t?%?p? Post:%p?%?b? Inc:%b?%?l? %l?]---(%s/%S)-%>-(%P)---\"\n"\
"Switch to Gmail"

macro index \e2 ":set signature=~/.signature_fake\n:\
set from=badguy@gmail.com\n:set realname=Jason\n:set status_format=\"-%r-Gmail2: %f \
[Msgs:%?M?%M/?%m%?n? New:%n?%?o? Old:%o?%?d? Del:%d?%?F? \
Flag:%F?%?t? Tag:%t?%?p? Post:%p?%?b? Inc:%b?%?l? %l?]---(%s/%S)-%>-(%P)---\"\n"\
"Switch to Gmail2"

The first three lines are to enable email matching during reply. That is, when you are replying emails sent to goodguy@gmail.com, the "From:" header is automatically set as goodguy@gmail.com, so that you don't need to set which account to use manually before reply. Note that this will not change the "from" environment, so when you compose new mail, the "From:" header will be the default "from" environment in .muttrc file, or others if you have manually changed the "from" environment as shown below.

If you need to compose a new email, you can choose which account to use by pressing ALT+1 or ALT+2, which will set the "from" environment to goodguy@gmail.com and badguy@gmail.com respectively.

Once you specified your "From:" header, msmtp will compare the header with "from" line in .msmtprc file, to find account with that email address to send the email. If msmtp can't find one, it will send email with default account in .msmtprc file.

OK, Done.

How to have a three columns template

Here's a very straight forward post on editing minima blogspot template to have three columns, like mine now.

Link

How to add a "Digg" button to your blogspot posts?

This is a pretty easy task, follow these steps:

  1. Go to "Layout" - "Edit HTML"
  2. Backup your template
  3. Click the box "Expand Widget Templates"
  4. Find "<data:post.body/>" in the template
  5. Add following lines BEFORE "<data:post.body/>"

<div style='float:right; margin-left:10px;'>
<script type='text/javascript'>
digg_url=&quot;<data:post.url/>&quot;;
</script>
<script src='http://digg.com/tools/diggthis.js' type='text/javascript'/>
</div>

How to archive your emails once a while?

If you are using Mutt, your mailbox files would grow larger and larger until it takes several seconds to open it in Mutt. One would say: gee, why do you keep old emails? Well, why not? I believe there should be enough space to store the old emails in hard drive nowadays. So here's the question: how do we save old emails?

Here's what we need to do:
  1. Don't delete emails, archive them into a specific mailbox, say, "archive" when hitting in Mutt. (By default, it is "d")
  2. Archive this mailbox into .tar file, and organize them in your mail directory so you can read them when you need to
  3. Delete the old "archive" mailbox file, and create a new and empty "archive" mailbox file.
  4. Do 1~3 every ten days.
OK, let's get started.

1 Save emails

This is simply redefine the "d" key, by default the delete key, in Mutt. Write the following in your .muttrc

macro index,pager d 's=archive'

Now when you hit "d", the email is not deleted, but saved to the archive mailbox.

2 Archive emails and delete old mailbox file

Here I assume you are using mbox mailboxes. Since we need to do this every ten days, a good choice is to write a script and let the system run this script every ten days. Here's the script I wrote.

#!/bin/sh

#set archive directory
basedir=/home/usrname/mail/archive/
#define archive directory suffix
suffix=$(date +%Y%m%d)
#define archive directory name
desdir=$basedir$suffix
cd /home/usrname/mail/
#create archive directory
mkdir $desdir
tar czf $desdir/archive.tar.gz archive
#remove old mailbox
rm archive
#create a new archive mailbox
touch archive
echo Email archive-$suffix successfully created #echo a success message


Save the script in your home directory, and change the mode of the script by running

chmod 700 email-archive


Then try the script in your home directory.

./email-archive


3 Configure crontab


Cron is a unix, solaris utility that allows tasks to be automatically run in the background at regular intervals by the cron daemon. These tasks are often termed as cron jobs in unix, solaris. To set the script to run every ten days, run the following command to edit cron jobs.

crontab -e

By default, it will get you into a vim editor. If you don't know how to use vim, follow the instruction at the end of this post.

In the editor, add the following line.

30 21 1,10,20 * * $HOME/email-archive


Run the following command to see if the cron job is correctly set.

crontab -l


Done!

Vim basics


When vim is started, you are not in the edit mode. Move cursor by hitting "j, k, h, l", and hit "i" at where you want to edit. You can see the INSERT not at the bottom. After done editing, hit ESC to quit edit mode. Then hit shift-z twice to save and quit.

Mutt tutorial | Mutt Configuration

Thank Andrew, Mark Stosberg for their insightful Mutt configuration web page.

Mutt is a text based email client. It doesn't have fancy interfaces like outlook, thunderbird. But indeed it is the most handy and configurable email client I've ever used. I've been using Mutt for a month, which is a tough month because I have to configure this and that until I feel comfortable using it.

Unlike other email clients, to use Mutt, you have to install at least two programs other than Mutt. One is for getting emails from server, another is for sending emails. In this tutorial, I use fetchmail to get email and msmtp to send mail. I also will introduce procmail, which is used to sort your emails into different mailboxes, which is extremely efficient if you have a large number of emails to read.

OK, let's get started.

1 Install

First of, you need to install all of the programs. In Debian based Linux OS, you just need to type the following command in a terminal

sudo apt-get install mutt fetchmail msmtp procmail


At this point, you'll see nothing when running mutt. That's because nothing has been set up, so mutt doesn't know where the mailboxes are. Therefore, our first goal is to receive the emails and save them to your computers. (I'm not a big fan of saving emails on the server, so I prefer downloading them to my hard drives and archiving old emails once a while)

After install, you need to set your email file in your system, and any incoming email are saved there. Let's say it's in the /home/username/mail/inbox file. To do this, simply create the folder in your home directory and add the following line in your .bashrc file.

MAIL=/home/username/mail/inbox && export MAIL


2 Receive Emails


2.1 fetchmail


Fetchmail can fetch your emails from server via POP3 and IMAP protocols, and It's pretty easy to set up.

First, create a file named .fetchmailrc in your home directory, and change the permission of this file by running following command (because you probably will write your password in this file).

chmod 700 .fetchmailrc


Then add the following lines to this file.

poll pop.gmail.com with proto POP3
user 'a@gmail.com' there with password 'aaa' is 'usrname' here options stripcr ssl sslcertck sslcertpath '/home/usrname/mail/certs/' keep
mda '/usr/bin/procmail -d %T'

poll pop.gmail.com with proto POP3
user 'b@gmail.com' there with password 'bbb' is 'usrname' here options stripcr ssl sslcertck sslcertpath '/home/usrname/mail/certs/' keep
mda '/usr/bin/procmail -d %T'

Change "usrname" to your Linux username. Note that I included ssl certificate check. The certificate file, as shown above, in located in your /home/username/mail/certs/ directory.

The certificates you need if you are setting up Gmail are Equifax_Secure_CA.pem and Thawte_Premium_Server_CA.pem. create the certificate files in your certs/ folder:

cd ~/mail/certs
touch Thawte_Premium_Server_CA.pem
touch Equifax_Secure_CA.pem

Then add these to your Thawte_Premium_Server_CA.pem:

-----BEGIN CERTIFICATE-----
MIIDJzCCApCgAwIBAgIBATANBgkqhkiG9w0BAQQFADCBzjELMAkGA1UEBhMCWkExFTATBgNVBAgT
DFdlc3Rlcm4gQ2FwZTESMBAGA1UEBxMJQ2FwZSBUb3duMR0wGwYDVQQKExRUaGF3dGUgQ29uc3Vs
dGluZyBjYzEoMCYGA1UECxMfQ2VydGlmaWNhdGlvbiBTZXJ2aWNlcyBEaXZpc2lvbjEhMB8GA1UE
AxMYVGhhd3RlIFByZW1pdW0gU2VydmVyIENBMSgwJgYJKoZIhvcNAQkBFhlwcmVtaXVtLXNlcnZl
ckB0aGF3dGUuY29tMB4XDTk2MDgwMTAwMDAwMFoXDTIwMTIzMTIzNTk1OVowgc4xCzAJBgNVBAYT
AlpBMRUwEwYDVQQIEwxXZXN0ZXJuIENhcGUxEjAQBgNVBAcTCUNhcGUgVG93bjEdMBsGA1UEChMU
VGhhd3RlIENvbnN1bHRpbmcgY2MxKDAmBgNVBAsTH0NlcnRpZmljYXRpb24gU2VydmljZXMgRGl2
aXNpb24xITAfBgNVBAMTGFRoYXd0ZSBQcmVtaXVtIFNlcnZlciBDQTEoMCYGCSqGSIb3DQEJARYZ
cHJlbWl1bS1zZXJ2ZXJAdGhhd3RlLmNvbTCBnzANBgkqhkiG9w0BAQEFAAOBjQAwgYkCgYEA0jY2
aovXwlue2oFBYo847kkEVdbQ7xwblRZH7xhINTpS9CtqBo87L+pW46+GjZ4X9560ZXUCTe/LCaIh
Udib0GfQug2SBhRz1JPLlyoAnFxODLz6FVL88kRu2hFKbgifLy3j+ao6hnO2RlNYyIkFvYMRuHM/
qgeN9EJN50CdHDcCAwEAAaMTMBEwDwYDVR0TAQH/BAUwAwEB/zANBgkqhkiG9w0BAQQFAAOBgQAm
SCwWwlj66BZ0DKqqX1Q/8tfJeGBeXm43YyJ3Nn6yF8Q0ufUIhfzJATj/Tb7yFkJD57taRvvBxhEf
8UqwKEbJw8RCfbz6q1lu1bdRiBHjpIUZa4JMpAwSremkrj/xw0llmozFyD4lt5SZu5IycQfwhl7t
UCemDaYj+bvLpgcUQg==
-----END CERTIFICATE-----

and these to your Equifax_Secure_CA.pem:

-----BEGIN CERTIFICATE-----
MIIDIDCCAomgAwIBAgIENd70zzANBgkqhkiG9w0BAQUFADBOMQswCQYDVQQGEwJVUzEQMA4GA1UE
ChMHRXF1aWZheDEtMCsGA1UECxMkRXF1aWZheCBTZWN1cmUgQ2VydGlmaWNhdGUgQXV0aG9yaXR5
MB4XDTk4MDgyMjE2NDE1MVoXDTE4MDgyMjE2NDE1MVowTjELMAkGA1UEBhMCVVMxEDAOBgNVBAoT
B0VxdWlmYXgxLTArBgNVBAsTJEVxdWlmYXggU2VjdXJlIENlcnRpZmljYXRlIEF1dGhvcml0eTCB
nzANBgkqhkiG9w0BAQEFAAOBjQAwgYkCgYEAwV2xWGcIYu6gmi0fCG2RFGiYCh7+2gRvE4RiIcPR
fM6fBeC4AfBONOziipUEZKzxa1NfBbPLZ4C/QgKO/t0BCezhABRP/PvwDN1Dulsr4R+AcJkVV5MW
8Q+XarfCaCMczE1ZMKxRHjuvK9buY0V7xdlfUNLjUA86iOe/FP3gx7kCAwEAAaOCAQkwggEFMHAG
A1UdHwRpMGcwZaBjoGGkXzBdMQswCQYDVQQGEwJVUzEQMA4GA1UEChMHRXF1aWZheDEtMCsGA1UE
CxMkRXF1aWZheCBTZWN1cmUgQ2VydGlmaWNhdGUgQXV0aG9yaXR5MQ0wCwYDVQQDEwRDUkwxMBoG
A1UdEAQTMBGBDzIwMTgwODIyMTY0MTUxWjALBgNVHQ8EBAMCAQYwHwYDVR0jBBgwFoAUSOZo+SvS
spXXR9gjIBBPM5iQn9QwHQYDVR0OBBYEFEjmaPkr0rKV10fYIyAQTzOYkJ/UMAwGA1UdEwQFMAMB
Af8wGgYJKoZIhvZ9B0EABA0wCxsFVjMuMGMDAgbAMA0GCSqGSIb3DQEBBQUAA4GBAFjOKer89961
zgK5F7WF0bnj4JXMJTENAKaSbn+2kmOeUJXRmm/kEd5jhW6Y7qj/WsjTVbJmcVfewCHrPSqnI0kB
BIZCe/zuf6IWUrVnZ9NA2zsmWLIodz2uFHdh1voqZiegDfqnc1zqcPGUIWVEX/r87yloqaKHee95
70+sB3c4
-----END CERTIFICATE-----

Then let the system know where the certificates are by running

$ c_rehash $HOME/mail/certs/


2.2 procmail


Since this tutorial is getting longer and longer, I'll explain procmail in a separate post. For now, all your mail will go to your $HOME/mail/inbox file.

3 Send mail


Create .msmtprc file in your home directory. Add following lines to this file.

account gmail
host smtp.gmail.com
port 587
from a@gmail.com
tls on
tls_starttls on
tls_trust_file /home/usrname/mail/certs/Thawte_Premium_Server_CA.pem
auth on
user a
password aaa

account gmail1
host smtp.gmail.com
port 587
from b@gmail.com
tls on
tls_starttls on
tls_trust_file /home/usrname/mail/certs/Thawte_Premium_Server_CA.pem
auth on
user b
password bbb

account default: gmail

Then change the permission as well:

chmod 700 $HOME/.msmtp


4 Configure Mutt


Create a file .muttrc in your home directory. Then add following to this file. A complete configuration file can be downloaded here

#======================================================#
# Default setting

set realname = "Your Name"
set from = "a@gmail.com" #Default account
set status_format="-%r-Gmail: %f [Msgs:%?M?%M/?%m%?n? New:%n?%?o? Old:%o?%?d?\
Del:%d?%?F? Flag:%F?%?t? Tag:%t?%?p? Post:%p?%?b? Inc:%b?%?l? %l?]---(%s/%S)-%>-(%P)---"

set use_from
set envelope_from ="yes"
set nomark_old
#set signature="~/.signature"

set sendmail="/usr/bin/msmtp"

set spoolfile = ~/mail/inbox

#=====================================================#
# Folders

set folder="$HOME/mail" # Local mailboxes stored here
set postponed="+postponed" # Where to store draft messages
set mbox_type=mbox # Mailbox type
set record="+/sent/sent-mail-`date +%Y-%m`"

#======================================================#
mailboxes ! =work =play

set sort_browser=size
#======================================================#
#Headers

ignore *
unignore Date: From: User-Agent: X-Mailer X-Operating-System To: \
Cc: Reply-To: Subject: Mail-Followup-To:
hdr_order From: Date: To: Cc: Reply-To: User-Agent: X-Mailer X-Operating-System Subject:

#======================================================#
# Editor

set editor="vim -c 'set tw=70 et' '+/^$' "
set edit_headers=yes # See the headers when editing

#======================================================#
# Aliases

set alias_file = ~/mail/.mutt_aliases # In their own file
source ~/mail/.mutt_aliases # Source them
set sort_alias=alias # Sort alphabetically

#======================================================#
# Colours: defaults are a little bleak so experiment!

source ~/mail/.colors # In their own file

#======================================================#
# Lists

subscribe mutt-users
set followup_to=yes # Sets 'Mail-Followup-To' header
set honor_followup_to=yes
fcc-hook mutt =mutt #See own posts

#======================================================#
# Compose

set markers # mark wrapped lines of text in the pager with a +
set smart_wrap # Don't wrap mid-word
set pager_context=5 # Retain 5 lines of previous page when scrolling.
set status_on_top # Status bar on top.
push # Shows mutt version at startup

set delete=yes
set sendmail_wait=-1
set forward_format="Fwd: %s"
set query_command="lbdbq '%s'"
set include # include original message
set fast_reply # No waiting after send
set wait_key=yes
set abort_nosubject=no
set abort_unmodified=no

#======================================================#
# Macros & Bindings

macro index,pager y ? "See mailbox list"
macro index,pager I ' fetchmail -v' "Fetchmail"
macro index,pager n '?'\
"Switch to next mailbox"

bind index,pager v next-unread-mailbox
bind index,pager V view-attachments
bind index ^N next-page
macro index d 's=archive'
macro index A 's=important'
bind index,pager ^D delete-message

bind browser v check-new
bind browser i exit
bind browser select-entry
bind browser view-file

bind index B bounce-message

#======================================================#
# Set multiple accounts

set reverse_name=yes

alternates "aaa@gmail.com|bbb@gmail.com"

macro index \e1 ":set signature=~/.signature_private\n:\
set from=aaa@gmail.com\n:set status_format=\"-%r-Gmail: %f \
[Msgs:%?M?%M/?%m%?n? New:%n?%?o? Old:%o?%?d? Del:%d?%?F? \
Flag:%F?%?t? Tag:%t?%?p? Post:%p?%?b? Inc:%b?%?l? %l?]---(%s/%S)-%>-(%P)---\"\n"\
"Switch to Gmail"

macro index \e2 ":set signature=~/.signature_fake\n:\
set from=bbb@gmail.com\n:set realname=Jason\n:set status_format=\"-%r-Gmail2: %f \
[Msgs:%?M?%M/?%m%?n? New:%n?%?o? Old:%o?%?d? Del:%d?%?F? \
Flag:%F?%?t? Tag:%t?%?p? Post:%p?%?b? Inc:%b?%?l? %l?]---(%s/%S)-%>-(%P)---\"\n"\
"Switch to Gmail2"

#======================================================#
# Print

set print = yes
set print_command="muttprint"


#======================================================#
# Html autoview
# Note: turn off autoview if you have Chinese google
# mailgroup/maillist

#auto_view text/html

#======================================================#
# Hook config

send-hook aaa@163.com$ 'my_hdr From: Good Guy '
send-hook aaa@163.com$ 'set signature="~/.signature_private"'

#======================================================#
# Misc

unset confirmappend # No confirmation after save


I suggest you read this line to line. The configuration is pretty self-explanatory. Note that I put my mutt color config. in another file and sourced it in .muttrc file. Also note that I have set up lots of custom-keybinding, you can change that if you want - Mutt is pretty good at custom configuration. The action defined after every keybinding set up can be found in Mutt it self. Just hit "?", you can see all the key bindings.

Basically, the most used keys are:
  • j: move to next unread email
  • k move to previous unread email
  • SPACE read current email
I'll write tutorials on color, procmail, and multiple accounts setup later.

5 Acknowledgment and useful links


Using Mutt with Gmail
The Mutt Cheatsheet
Learning Mutt
Mark's Mutt Fan and Tip page

6 Related Posts

Multiple accounts in Mutt

Feb 11, 2009

How do I to disable the mail alert send by crontab?

Q. How do I to disable the mail alert send by crontab? When my job is executed and the jobs cannot run normally it will sent an email to root. Why do I receive e-mails to my root account from cron? How can I prevent this?

A. crontab command is use to maintain crontab files for individual users.

By default the output of a command or a script (if any produced), will be email to your local email account. To stop receiving email output from crontab you need to append following string:

Cron Job Prevent the sending of errors and output

To prevent the sending of errors and output, add any one of the following at the end of the line for each cron job to redirect output to /dev/null.
>/dev/null 2>&1.
OR
&> /dev/null

Feb 9, 2009

Finally figured out why my UT webmail can't receive email

That's because I set up an forwarding email in the system.
And the server will not keep the email after forwarding it, kinda like what procmail does.

Anyway, now I can use a simple username university email. xxxxx@mail.utexas.edu as my work email, and gmail as my personal email.

Great!

Feb 8, 2009

Road to Linux 2009

Once upon a time, I installed Ubuntu-I-forgot-the-version on my PC in college, with dual boot of course. It was interesting, although Linux desktop wasn't as good as it is now. That Linux installation ended up ... system crash.

The laptop I am using now was bought in Oct 2008. Lenovo Thinkpad T61, T9300, 2G, 100G. I choose Windows Vista Business when I bought it - pretty expensive. Then I got sick of Windows, and thought, gee, why not install an Ubuntu on it. There started my road to Linux, the only OS on my laptop now.

Long story short, here is the time table.

Dec 2008, I installed Ubuntu 8.04 LTS on my girlfriend's old laptop Thinkpad R51, through wubi installation.

Jan 2009, I installed same distro on my T61, with dual boot, and everything worked great.

Jan 2009, Bye Windows. My T61 is powered by Ubuntu, only.

Installing Ubuntu was pretty easy, and there are tons of threads of discussion on Ubuntu on internet. I burned the 8.04LTS to cd, and took 20ish minutes to get it done. The only thing needs to be pointed out is that I didn't use the default partition option. My partition is / 20G, /swap 2G, and /home the rest of my 100G hard drive.


Welcome to Non-geek's
Linux Handbook!

or if you will, Linux Cookbook.

Read my READY-TO-USE
RECIPE-LIKE
tutorials on Linux applications~

Subscribe if you are willing to follow.

If you find the post useful, please click the donate button on the upper right corner. Any amount is useful.